Trying to get a head start on Holidays? How about Handmade-REUSABLE-DESTASHED gift bags =)
This is my first tutorial EVER so please bare with me. Questions, comments and suggestions are appreciated.
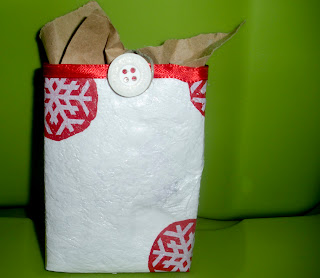
Here are my Christmas ones. These are itty bitty, just big enough for jewelry boxes (which is what they were intended for).
TUTORIAL:

Step 1: Gather all your materials. As I've shown here you need plastic bags (6 layers to make a strong layer) plus any colors/shapes you want to apply. For these I just used the target holiday bags. You also need scissors, hot iron, hot glue, ribbon/buttons/hemp etc for embellishments, two pieces of paper or parchment, pencil and paper to create a template, and a highlighter.
Step 2: Create your fused fabric. There are a ton of tutorials on that so I wont go into it, but a few tips: (depends entirely on the thickness of your bags, ink and your iron) mine ONLY works on the highest heat level, and I find it quicker to fuse 3 bags and continue adding them. I also placed my designs on the fabric and covered that with clear plastic bag so they stick better with no chance of peeling off in the distant future.
Step 3: create your template on a piece of paper. You can find these anywhere on the internet. To be honest I just winged it and it happen to work each time. I just found this site that has over 50 templates: http://melstampz.blogspot.com/2008/11/50-gift-bag-templates.html use that if your not feeling creative =P Next copy your template onto the plastic using a highlighter. I use a highlighter because it wipes off when your done. (See 3a and 3b)

Step 4: After you bend your creases where the highlighter marks were, you need to cut. The measurements for this bag folded are: 4"x4.5"x1.5"x1.5" which makes the template 12"x6" As you can see in the picture the bottom corner piece is cut off entirely.
Step 5: the one inch strip is glued to the interior of 1.5" strip when folded together. (This photo step didn't come out sorry!) but once glued it should look like the picture.

Step 6: This is the bottom of the bag. Glue the two small edges onto ONE of the large edges. Then glue the OTHER large edge on top of those. This seals the bag and hides all the edges! It should look like 6b when your done. (Mine appears to be doing the wave in this picture..)
Step 7: Your done with the basic bag! Now to embellish how you see fit! I wrapped the top in ribbon as it hides any unevenness in the bag consistency and goes with it! Just apply hot glue and wrap.

Step 8: Optional of course. I decided to make a layered button closure. So I cut a small piece of ribbon to fit the back of the button, glued and layered the buttons so it fits the rest of the ribbon. Then glued it to the outside of the bag as pictured.
Step 9: To finish my bag I dabbed a piece of hot glue on the interior opposite of the buttons and place a piece of hemp cord that would attach to the buttons. Then hot glued OVER it to finish with ribbon and give it a clean look.

BE CREATIVE and enjoy! I made everything entirely from stash and was eco friendly. Cuter than store bought and MUCH cheaper, plus reusable!

Linked up to any of these:


This is my first tutorial EVER so please bare with me. Questions, comments and suggestions are appreciated.
Here are my Christmas ones. These are itty bitty, just big enough for jewelry boxes (which is what they were intended for).
TUTORIAL:
Step 1: Gather all your materials. As I've shown here you need plastic bags (6 layers to make a strong layer) plus any colors/shapes you want to apply. For these I just used the target holiday bags. You also need scissors, hot iron, hot glue, ribbon/buttons/hemp etc for embellishments, two pieces of paper or parchment, pencil and paper to create a template, and a highlighter.
Step 2: Create your fused fabric. There are a ton of tutorials on that so I wont go into it, but a few tips: (depends entirely on the thickness of your bags, ink and your iron) mine ONLY works on the highest heat level, and I find it quicker to fuse 3 bags and continue adding them. I also placed my designs on the fabric and covered that with clear plastic bag so they stick better with no chance of peeling off in the distant future.
Step 3: create your template on a piece of paper. You can find these anywhere on the internet. To be honest I just winged it and it happen to work each time. I just found this site that has over 50 templates: http://melstampz.blogspot.com/2008/11/50-gift-bag-templates.html use that if your not feeling creative =P Next copy your template onto the plastic using a highlighter. I use a highlighter because it wipes off when your done. (See 3a and 3b)
Step 4: After you bend your creases where the highlighter marks were, you need to cut. The measurements for this bag folded are: 4"x4.5"x1.5"x1.5" which makes the template 12"x6" As you can see in the picture the bottom corner piece is cut off entirely.
Step 5: the one inch strip is glued to the interior of 1.5" strip when folded together. (This photo step didn't come out sorry!) but once glued it should look like the picture.
Step 6: This is the bottom of the bag. Glue the two small edges onto ONE of the large edges. Then glue the OTHER large edge on top of those. This seals the bag and hides all the edges! It should look like 6b when your done. (Mine appears to be doing the wave in this picture..)
Step 7: Your done with the basic bag! Now to embellish how you see fit! I wrapped the top in ribbon as it hides any unevenness in the bag consistency and goes with it! Just apply hot glue and wrap.
Step 8: Optional of course. I decided to make a layered button closure. So I cut a small piece of ribbon to fit the back of the button, glued and layered the buttons so it fits the rest of the ribbon. Then glued it to the outside of the bag as pictured.
Step 9: To finish my bag I dabbed a piece of hot glue on the interior opposite of the buttons and place a piece of hemp cord that would attach to the buttons. Then hot glued OVER it to finish with ribbon and give it a clean look.
BE CREATIVE and enjoy! I made everything entirely from stash and was eco friendly. Cuter than store bought and MUCH cheaper, plus reusable!
Total cost (for me) $0 [had everything on hand!]
Have a question? Let me know! I'd be happy to answer it!
Linked up to any of these:
Featured at:
Such great little bags! I hope you'll stop by and share them at the Pretty Packages Party!
ReplyDeletehttp://blackberryvine.blogspot.com/2011/02/pretty-packages-party-6.html
smiles!
Jami
That is such a cute idea...what a great tutorial!
ReplyDeleteThanks so much for linking up to the Pretty Packages Party! Hope to see you next month!
ReplyDeletesmiles!
Jami
Love this idea! I've never actually heard of fused fabric, so I'll have to google it. What a great way to upcycle! Thanks for sharing.
ReplyDeleteIts really nice post. Thanks for sharing the information.
ReplyDeleteGift Baskets